Tuesday, August 7, 2012

Cute Animal Print Nail Designs

Don't let the title intimidate you into clicking the Back button on that browser. Here, you'll learn how to do your own cute animal print nails; zebra, leopard, and giraffe. Getting the look isn't as hard as it may seem, believe me. Especially if you have the right tools to work with. Heck, even if you don't there is always room to improvise. Say you don't have the nail art brush kit polishes, as long as you have a thin stick about the thickness of a toothpick, or something similar and plain old nail polish, you can still get a decent design from it. Making dots, swirls, and lines are just a start and it's also the basis of what I will be demonstrating. So get out your favorite color combinations and gather your tools because class is starting!
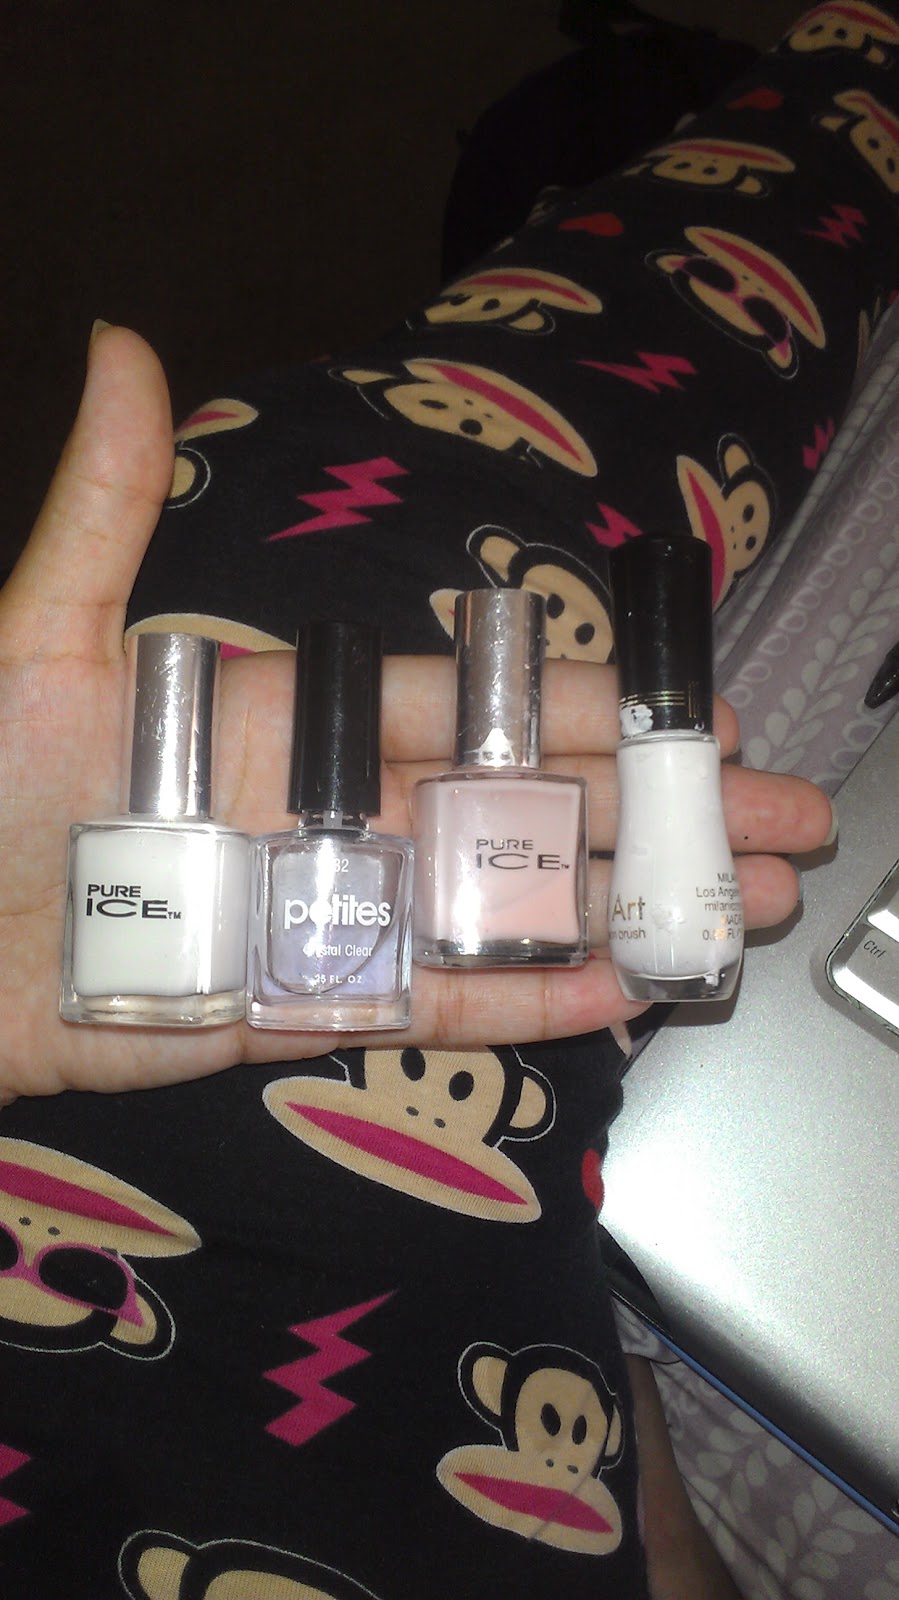
Okay, start with a quick clean-up of any old polish left on the nails, even if there isn't any just to clean off the nail and file or clip the nails to the desired length. Push back the cuticles and pick your base coat. I chose to use a pure white, Pure Ice brand in White Canvas. This brand's formula is pretty sweet because it dries in no time and its super affordable at $1.99!
I'll go for the leopard print first since it takes the most time to complete compared to the others. I used a hot pink for the inside color of the spots and black as the spot outline. You can use any color you choose! Its all up to you, which makes DIY so great. Make small dots varying in size over your base color in random places. Let dry. Now the fun part. Take the outlining color, mine being black for the demonstration, and blot oblong dots to almost surround the center dot. I use no more than four dots and make them pretty big to mimic the print as close as possible. Let the design dry before putting on a clear coat or else you'll be smearing that design all over the place.
Now to the zebra print. This print can be as hard as you make it. In this demonstration, I'm also using a white base and black for the stripe. Bursting with color, huh? I usually like to start from the top left corner and drag  across with a slight diagonal tilt then the same on the other side, going from right to left, careful not to the two lines touch. Remember to add a very light pressure when starting the line then lift the precision brush (or other tool) as you go to form a thick to thin line. This best replicates the natural stripe of a zebra. Just repeat making the lines until you reach the tip of the nail and done. The completed stripes should overlap slightly and shouldn't reach to the other side of the nail. This technique can be altered slightly for tiger print by just angling the thin tail of the stripe downward as you reach the middle. Seal with a clear coat and admire.
And at last, giraffe print, which is pretty unique because its not as random as leopard print but still needs to remain pretty uniform to make the print easy to distinguish. It could be mistaken for cow print if you're not careful. Not that that's a bad thing, since cow print could be used to bring out that inner Cowgirl. Yeehaw! I kept the white base and this time I'll go for using a neon orange as the base. Since the orange isn't very opaque I had to use the white to brighten the color and make it stand out more. So if you don't need to use a white base, don't. After the orange dried I too the white nail art polish with precision brush and did a few straggly lines down then across, stopping short where the lines intersect to drop then line a bit and even thicken it as I go.Try not to get the lines completely straight or you'll end up with what looks like a Tic-Tac-Toe board on your nails. Pull up an image if need be to get an idea of what you're going for. Keep in mind though that each animal print differs so try not to stress when you see a print or image that's different than what you produce. Once you're satisfied, seal with a clear coat and let dry.
As you can see, I'm no artist. No where close! But I was still able to get a cute animal print nail design that is fun and customized to my style. All because I did it myself and it costs next to nothing. I think that's as good as it gets, don't you?

Sunday, August 5, 2012

Nail Care For Dummies, Simple Tips For Healthy Nails

Okay, I'm no expert on skin health or a trained and licensed nail technician but I am a young lady that loves to keep her appearance a top priority. This including the appearance of my hands and fingernails. It is such an easy thing you can overlook, yet it's also an easy thing to fix. Cracked and brittle nails, dry skin and cuticles; it isn't rocket science on how to help improve the condition of your most used tools. Trust me, with a few things you have in your bathroom cabinets, and even your pantry, you could produce some really healthy nails in no time.
I was once a kid who was obsessed over biting off my nails and leaving them ragged and downright ugly. Kids don't care, at least for a girl, I didn't. I was a tomboy so nail polish, and nail care in general, were as close to my conscious thoughts as Pluto is to Earth. Now that I'm all grown up and has put that nasty habit behind, I can actually appreciate what a good lather of cream or a few swipes of polish can do for a hand.
Days that I want to keep my nails polish-free, or don't want to sit inhaling a cloud of polish fumes, I love a good nail buffing. Now, I'm not talking about taking a drill to your nails and skimming off all your top layers. No, this is way less harsh. You do take off the damaged and less appealing layers of nail and add a healthy shine. Its usually an item shaped as either an emery board or a small foam block, depending on what level you want to take buffing to. I own a small block-shaped 4-way nail buffer I bought from Sally's Beauty Supply for about $3. Its pretty much an all-in-one buffer that files, smooths, buffs, and polishes; a different use per side of the block. Pretty good investment if I do say so myself!
Nail buffing is also a safer and 'greener' way to add a shine without the chemicals of nail polish. Even though some nail lacquers are starting to eliminate the 'toxic trio', consisting of the ingredients dibutyl phthalate (DBP), formaldehyde and toluene, nail buffing is still the safer route. The motion used in nail buffing also helps to increase the circulation in your nails, promoting the growth of longer and stronger nails. No special creams, polishes, or pills involved, so no extra expenses as long as you take good care of the buffer by cleaning and disinfecting it between uses. Awesome, isn't? Saving your nail's health while saving money. Brings a smile to my face. *smile*
I mentioned saving money, right? Well, another cost effective way to keep those fingers fine and fancy is to keep them moisturized. Especially those cuticles. Keeping those nails groomed around the edges and beyond makes a world of difference. The grooming process can be difficult to keep up with at times, having to wash your hands frequently, leaving them dry and over exposed. Your hands constantly need moisture. This calls for some deep conditioning when ever possible. Using oils such as olive oil, vitamin E oils, tea tree oil, and even plain old vegetable oil on your cuticles can do good things. Great things if you make it a part of your daily regiment. Just moisturize your cuticles, preferably with cuticle remover, push them back with an orange stick, if you have one. If not, using a dull edge of a credit card and using gentle pressure could do the trick too. Don't forget to lather up your hands with your favorite creams and voila! How easy was that? Simple, yet cheap as ever to do. Not to mention it's keeping your nails HEALTHY and naturally beautiful all year-round!
Like I was saying before, I'm no expert nor am I certified on this, but one thing that I know I can say is you'll definitely be flaunting your bare-naked nails more often thanks to these very easy solutions that cost next to nothing. I know I do and I'm more than satisfied with the improvement it has made to my hands' appearance. *smile*

DIY Manicures You Can Do At Home


Whether you're in the mood for a pop of color and splash of design or a classic look such as a French manicure, you can achieve these looks with just a few quick items and steps. What's even better is that you can achieve these looks in the comfort of your home! Precision and expertise isn't a must so don't be intimidated by these fast and fashion-forward looks. To keep it simple, I will start with a clean and classic French manicure. Even this style is easy to dress up with color prints and sparkling rhinestones!
All you need to start for a French manicure is a sheer pink to enhance the natural color of your naked nails, white polish for the nail tips, if you have long nails, and white polish with a nail art brush for shorter length nails and also for touch ups, and last but not least, a clear coat for shine. I included a picture to show what I personally used to get my look in the picture shown below and also clarify anything regarding the brands.
First, start by cleaning any excess polish from your nails and cleaning up the cuticles of your nails. If need be, file and shape your nails to an even length to improve the overall quality of the finished look. After all, you are trying to go for that fresh from the salon look.
Next, go over your nails with the sheer pink of your choice, starting with just one coat. I used Pure Ice brand in Tickle Me Pink because its just the perfect opacity without being too pink and it dries in a snap.Let both hands dry completely before starting your white tips. It shouldn't take longer than fifteen minutes for one coat.
If you have long nails, use a thin coat and paint your tips with the plain white. For this, I also used Pure Ice brand. If your nails are short, you can get buy with just using a white polish with a nail art brush such as Milani Nail Lacquer in White Canvas. It comes complete with a precision brush for hitting all the right angles. Perfect for French manicures, in my opinion.
Outline the arch where the nail length starts from the nail bed with the white to complete the tips and get any spots that you may have missed. Remember, you don't have to have hands like a surgeon to get a great result. There is really no science to it either so don't get worked up and discouraged. Practice makes perfect! Let dry as long as needed, about thirty minutes or so, or until the tips are no longer tacky to the touch.
Lastly, go over all your nails with a clear coat to seal in the colors and add a boost of shine. You can also stick a few rhinestones on whatever nails you choose to amp up the manicure or use a toothpick to add dots, swirls, or even design a print! Moisturize those hands with your favorite hand lotion and you're ready to go!
Getting this straight from the salon look shouldn't cost no more than $10 if you already have a few basic items on hand. The best part is that you get to show off those beautiful NATURAL nails and paying next to nothing for it. The polishes I used were VERY affordable and held up great for well over a week, maybe two. They're even available in almost any store that sells cosmetics and beauty products. Can you imagine going out for a French manicure for less than $10? I don't think I can.
So if you're in a hurry and need a quick nail outfit, or you just need to dress up those fingers, what's a better option than to do your own French manicure that you created YOURSELF in your own home!